Applies to:
Terminal Management TMX
Requires:
Email configured in Terminal Management TMX. See How to configure email settings for more information.
Scheduling Email Reports
Scheduled emails are configured in the “Reports” section of Terminal Management TMX, under the “E-mail Reports” tab.
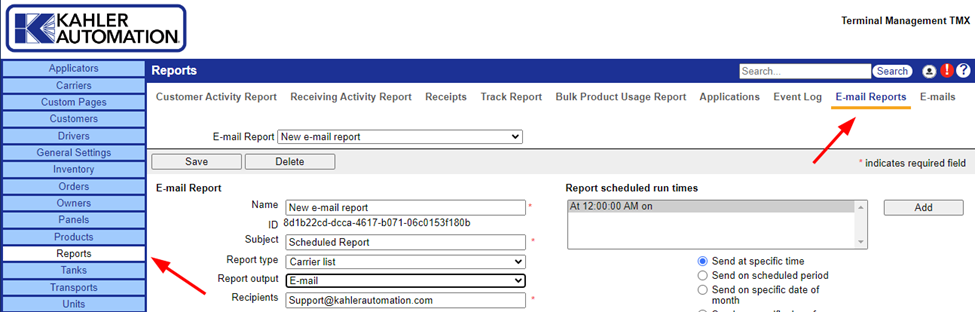
To Create a new scheduled report, make sure “Enter new e-mail report” is selected at the e-mail report dropdown at the top of the page; this will be the default when first opening the “E-mail Reports” tab.
On the left-hand side is the “E-mail Report” section where the report is chosen, given a subject, and recipients. From top to bottom the fields are:
- Name: The name of the report. This is how the report will be titled in Terminal Management TMX.
- Subject: This is the subject the E-mailed report will have when it is sent out.
- {now} will be replaced by the time the report was sent.
- {last_sent} will be replaced by the time the report was sent.
- Report Type: The type of report to be sent. The available reports are described in the help file, found by clicking the “?” at top right.
- Report Output: Either “E-mail” (default) or “Save File” may be chosen. Choosing “E-mail” will result in an e-mail being sent to all Recipients. Choosing “Save File” allows the report to be saved to the local drive of the Terminal Management TMX Server.
- Recipients: A comma or semi-colon separated list of e-mail addresses that the report should be sent to.
- If “Save File” was selected as “Report Output”, “Recipients” will be replaced by “Report file location and name”. This should be a fully qualified file path and name local to the Terminal Management TMX server. This may use the {now} notation to include the time the report was run in the file name.
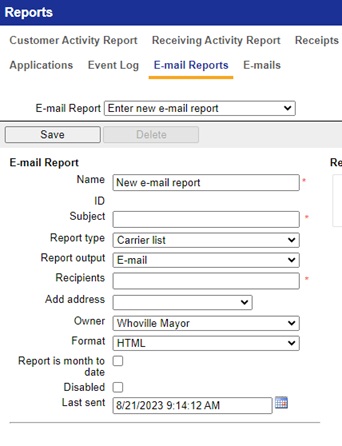
- Report domain URL: The domain to use when creating links in the report. If nothing is specified, links may not work.
- Owner: The owner of the report. If the user logged in has been assigned to a specific owner, only the reports for that owner will be available to the user.
- Format: Options are “HTML”, “HTML (Printer Friendly)”, and “CSV”.
- HTML is designed for viewing on PC.
- HTML (Printer Friendly) is designed for printing.
- CSV is designed for use in a spreadsheet program such as Microsoft Excel or otherwise imported into another program.
- Report is month to date: If enabled, the report will be run on data from the beginning of the month to the present time.
- Disabled: Specifies if the report should be e-mailed out. If a report is disabled, it will be logged that the report was not run due to being disabled.
- Last sent: The date the report, updated automatically. This value is used on reports that include data from the last time they were sent.
- Report specific configuration: These options will depend on the report type selected, and shown on the left-hand side below the horizontal dividing line.
Configuring the Schedule
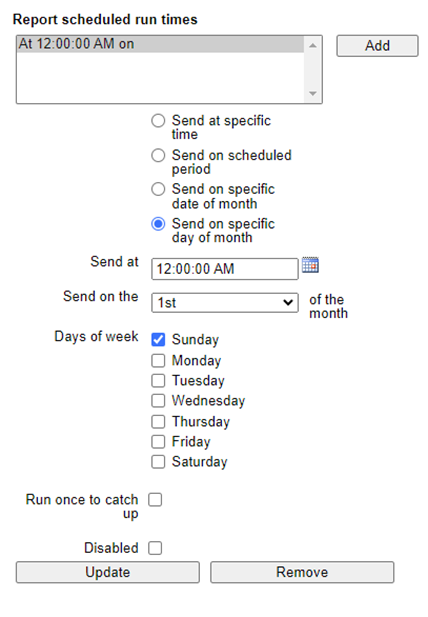
Once a new e-mail report has been saved, one or more schedules must be added under “Report scheduled run times” on the right-hand column of the page. Click “Add” to create a new schedule and then configure it below.
- Send at specific time: Sets the report to run at the specific time of the day assigned in the “Send at” section, on the days of the week defined in the “Days of week” section.
- Send on scheduled period: Sets the report to run every X minutes, as defined in the “Send every minutes” section, on the days of the week defined in the “Days of week” section.
- Send on specific date of month: Sets the report to run at the specific time assigned in the “Send at” section, on the date assigned in the “Send on the date of the month” section.
- Send on specific day of month: Sets the report to run at the specific time assigned in the “Send at” section, on the date assigned in the “Send on the day of the month” and “Days of week” section. The options listed are which instance of the date the report should be run on. For example, setting this to the 2nd Monday will generate the report on the 2nd Monday of the month (which occurs with a date between 8 and 14).
Each schedule also has two configuration options in common:
- Run once to catch up: If set, all missed report triggers will be combined into a single report when it is run. If this is not selected and there have been multiple triggers since the last time the report was run, the E-mail Service will send out individual reports for each missed trigger (if the report is date- and time –dependent).
- Disabled: Allows a report schedule to be disabled without disabling the entire report. Useful when there are multiple schedules set for a report.
Once a report is configured as required, click “Update” to save schedule settings, and “Save” to save report setup.
Still Need Help?
Submit an online web ticket or call us at Kahler Automation 507-235-6648 Option 2.